0%

虽然大部分问题在开发中就可以避免,但是有些隐蔽的问题还是需要一些工具来监测

Xcode自带的工具是测试阶段的首选,这里就不讲了。

内存泄漏

这是一个很容易导致 OOM 的问题,在 App 中内存泄漏大部分是由于循环引用引起的。

我们需要在对象应该被释放之前,传递给一个延时执行的方法,来判断一段时间后对象是否有被销毁:

1
2
3
4
5
6
7
8
9
10
11
public class MemoryChecker {
public static func verifyDealloc(_ object: AnyObject?) {
#if DEBUG
DispatchQueue.main.asyncAfter(deadline: .now() + 5) { [weak object] in
if let object = object {
fatalError("Class Not Deallocated: \(String(describing: object.classForCoder ?? object)))")
}
}
#endif
}
}

控制器是一个很重的对象,如果控制器退出没有释放,那么会造成很大的内存泄漏,所以在监测 NavigationControllerpopdeinit 方法以及 ViewControllerdismiss 方法:

1
2
3
4
5
6
7
8
9
10
11
12
class NavigationController: UINavigationController {

deinit {
viewControllers.forEach{ MemoryChecker.verifyDealloc($0) }
}

override func popViewController(animated: Bool) -> UIViewController? {
let viewController = super.popViewController(animated: animated)
MemoryChecker.verifyDealloc(viewController)
return viewController
}
}

也可以覆盖 UITableView,监测 TableView 释放后, cell 是否有内存泄漏

1
2
3
4
5
6
7
8
9
10
11
12
13
14
15
16
17
18
19
20
21
22
23
24
25
26
27
28
29

class WeakBox<A: AnyObject> {
weak var unbox: A?

init(_ value: A) {
unbox = value
}
}

class TableView: UITableView {
private var allCells: [WeakBox<UITableViewCell>] = []

private func appendIfNotPresent(_ cell: UITableViewCell) {
if allCells.first(where: { $0.unbox === cell }) == nil {
allCells.append(WeakBox(cell))
}
}

override func dequeueReusableCell(withIdentifier identifier: String, for indexPath: IndexPath) -> UITableViewCell {
let cell = super.dequeueReusableCell(withIdentifier: identifier, for: indexPath)
appendIfNotPresent(cell)
return cell
}

deinit {
allCells.forEach { MemoryChecker.verifyDealloc($0.unbox) }
}
}

当然有时候控制器会释放,但是它持有的某些 View 内存泄漏,所以实际应用中会进行递归遍历控制器与view的所有强引用变量。

第三方库

MLeaksFinder

MLeaksFinder 就是通过类似上面逻辑来判断是否有内存泄漏,它会重载 NSObjectwillDealloc 方法,对需要检测的对象进行延时 2 秒后检测,如果还存在,那么就打印对应的持有栈信息:

1
2
3
4
5
6
7
8
9
10
11
12
13
14
15
16
17
- (BOOL)willDealloc {
NSString *className = NSStringFromClass([self class]);
if ([[NSObject classNamesWhitelist] containsObject:className])
return NO;

NSNumber *senderPtr = objc_getAssociatedObject([UIApplication sharedApplication], kLatestSenderKey);
if ([senderPtr isEqualToNumber:@((uintptr_t)self)])
return NO;

__weak id weakSelf = self;
dispatch_after(dispatch_time(DISPATCH_TIME_NOW, (int64_t)(2 * NSEC_PER_SEC)), dispatch_get_main_queue(), ^{
__strong id strongSelf = weakSelf;
[strongSelf assertNotDealloc];
});

return YES;
}

MLeaksFinder 对代码没有入侵,只要导入头文件即可,是因为它使用了Category 进行一部分方法的重写以及使用方法替换了 UINavigationController 中的一系列 pop push 方法与 UIViewController 中的 dismiss viewDidDisappear

缺点是对于 Swift 类无法监测

FBRetainCycleDetector

这是用来检测循环引用的,将想要检测的对象传入探测器,会对对象的强引用对象进行递归遍历,默认查找10层,最后在整个有向图中应用 DFS 算法查找环。如果有向图存在环,则说明目标对象存在循环引用。

MLeaksFinder中也集成了 FBRetainCycleDetector ,在检测到内存泄漏后,可以直接点击 Retain Cycle 将检测到泄漏的对象提交给 FBRetainCycleDetector 监测是否有循环引用

OOM监测

由OOM引起的崩溃程序无法捕获,也就没办法统计反馈。

2015年 facebook 提出了一种方案,在程序启动时,根据上一次程序终止保存的状态,排除:

  • 该应用程序已升级。
  • 应用程序调用退出或中止。
  • 该应用程序崩溃了。
  • 用户向上滑动以强制退出应用程序。
  • 设备重新启动(包括操作系统升级)。

这些问题,那么就判定为发生了 OOM,再根据App最后是否在后台判断是 FOOM 还是 BOOM

但是这种判断没法检测所有场景,容易发生误判。

OOMDetector

腾讯开源的工具,通过Hook IOS系统底层内存分配与释放的方法,跟踪并记录进程中每个对象内存的分配信息,包括分配堆栈、累计分配次数、累计分配内存等,这些信息也会被缓存到进程内存中。在内存触顶的时候,组件会定时Dump这些堆栈信息到本地磁盘,这样如果程序爆内存了,就可以将爆内存前Dump的堆栈数据上报到后台服务器进行分析。

虽然此工具性能高,但是持续的监控内存还是会 cpu 性能、内存占用造成一定的影响。

字节跳动的方案

定时监测 App 内存占用,超过设置的阈值后启动内存分析,挂起所有其他线程,对内存进行快照,采集所有节点信息,然后构建引用关系,生成日志后恢复所有线程状态,然后对日志进行压缩 上传处理,因为在采集的时候会挂起所有非采集线程,所以整个 App 会卡住,需要限制触发频率与上限。

好处是在程序正常运行时,几乎不会对性能产生影响,只有在临近 OOM 时,会进行内存信息采集。

最后

由于 OOM 无法直接捕获,只能通过这些间接的方法来实现,具体上线项目使用什么方案,按项目情况自己选择。

OOM 也就是 Out of Memory Crash,是由于内存不足的崩溃

iOS在内存不足时会给 App 发出警告,对应 App 进行适当处理,如果处理后还是不足,那么就会结束进程

OOM 可以分为 Foreground OOM / Background OOM 两类,其中 FOOM 是由于应用在前台占用过多的内存而被系统杀死,而 BOOM 则是 App 处于后台时,由于前台有别的活动占用大量内存,为了保证前台程序的正常运行,而且后台内存清理后仍然不足,会根据优先级去杀死一些后台进程。

1、iOS内存构成

内存的分配由系统管理,一般以页为单位,在 iOS 系统中,一页的大小是 16KB,所以在 iOS 中一个 App 所占用内存大小为 页数 * 16KB

这些页可以分为3类

净页 (净内存) Clean

这部分内存大概有

  • app 的二进制可执行文件
  • framework 中的 _DATA_CONST 段
  • 文件映射的内存
  • 未写入数据的内存

前三类都是一些只读的类型,在内存紧张时,这部分内容如果不处于使用中,那么随时可以回收,对应的资源需要使用时,再进行分配读取进内存

未写入数据的内存比如分配一个容量为 20000的 Int 类型数组 int * array = malloc(20000 * sizeof(int)),系统会分配几页内存给数组,但是没有写入数据,这时候这部分内存都属于净内存

如果给数组加入数据 array[0] = 10,那么第一页内存将会变成脏页,如果写入数据 array[19999] = 20 ,那么最后一页也会变成脏页,但是中间的页依然是净页

脏页(脏内存)Dirty

是指被 App写入数据的内存,包括 图片解码的缓冲区 大部分分配的堆内存 Frameworks 中使用runtime方法交换使用的内存

压缩内存 compression

当内存不足的时候,系统会按照一定策略来腾出更多空间供使用,比较常见的做法是将一部分低优先级的数据挪到磁盘上,之后当再次访问到这块数据的时候,系统会负责将它重新搬回内存空间中。然后对于移动设备而言,频繁对磁盘进行IO操作会降低存储设备的寿命。所以从iOS7开始,系统开始采用压缩内存的方式来释放内存空间。

在iOS中当内存紧张时能够将最近未使用过的脏内存占用压缩至原有大小的一半以下,并且能够在需要时解压复用。在节省内存的同时提高系统的响应速度,缺点就是增加 cpu 的运算,以时间换空间。

在开发中,我们只需要关心脏内存与压缩内存,净内存系统会自动回收与加载,不会影响 App 内存

2、OOM 常见原因

使用内存(缓存)过大

在平时的开发中,我们经常会把需要反复使用的数据进行缓存,避免 cpu 进行重复计算,包括各种计算结果的缓存以及单例、全局对象的使用。

还有一些不恰当的操作,比如有终止条件有漏洞的递归函数。

图像的不恰当使用是一个很大的原因,图像的解码与渲染会占用大量内存,在同时使用大量高清晰度图片的时候,累计内存使用会很高

例如

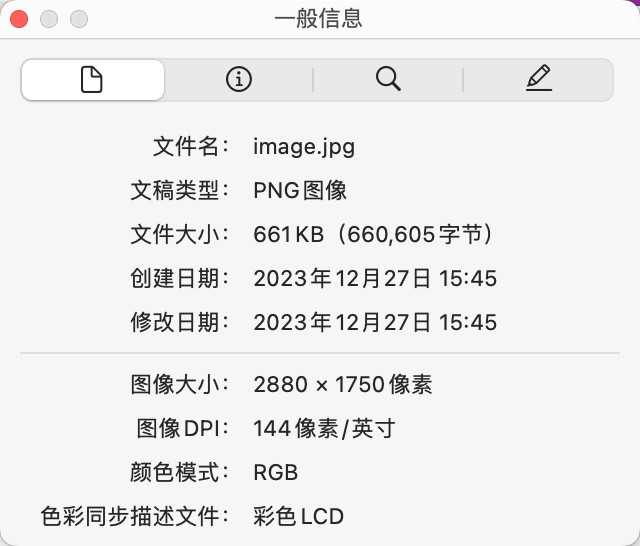
照片是2880 x 1750像素,色彩空间是 RGB,具有 DisplayP3 颜色配置文件(在这里的 MBP 屏幕上,彩色LCD默认就是 P3)。此颜色配置文件每像素占用 16 位。因此,使用这样的照片UIImage(named:) 大约需要2880 x 1750 x 8 bytes ≈ 38.45 MB

循环引用

循环引用的最终结果是造成内存泄漏,导致到程序结束之前都无法释放,随着运行时间的增加,泄漏累计会使 App 占用内存越来越大,最终崩溃

还有比如使用 UIWebView 的内存泄漏问题等

3、避免 OOM

谨慎使用缓存

如果不需要实现自定义缓存,Apple 建议使用NSCache,因为它内部实现了智能机制,可以在系统内存不足时清除缓存

如果应用程序需要更复杂的缓存实现,请注意为可以持久保存的数据量设置明确的限制,并实现一些逻辑来清除旧对象,以便永远不会超出此限制。

例如使用 Alamofire 我们可以给图片下载添加缓存限制:

1
2
3
4
5
6
7
8
9
 private func setupAlamofireCache() {
let imageCache = AutoPurgingImageCache(
memoryCapacity: 30_000_000,
preferredMemoryUsageAfterPurge: 15_000_000
)

UIImageView.af_sharedImageDownloader = AlamofireImage.ImageDownloader(maximumActiveDownloads: 12,
imageCache: imageCache)
}

加载图片时要小心

如果应用需要显示大量大型高分辨率图像,用于在屏幕上渲染它们的图像缓冲区可能会产生较高的内存消耗。

除了让服务器在数据中提供多种尺寸的图片以外,在程序中合适使用工具也可以显著降低内存占用

图片的颜色配置文件,会影响用于表示内存中图像的每个像素的位数。sRGB 使用 8 位,显示 p3 使用 16 位。这可能会产生接近一倍的差距

在进行图片处理时,最好使用 ImageIO 库,抛弃老旧的 UIGraphicsBeginImageContextWithOptionsUIGraphicsRenderer 自动识别需要使用的色彩空间,并在必要时利用 Display P3 配置文件

我们拿到图像的 URL 后,通过UIGraphicsRenderer进行图像的处理:

1
2
3
4
5
6
7
8
9
10
11
12
13
14
15
16
17
18
19
20
21
22
23
24
25
26
27
28
29
30
31
public extension UIGraphicsRenderer {

static func renderImagesAt(url: URL, size: CGSize, scale: CGFloat = 1) throws -> UIImage {
let renderer = UIGraphicsImageRenderer(size: size)

let options: [NSString: Any] = [
kCGImageSourceThumbnailMaxPixelSize: max(size.width * scale, size.height * scale),
kCGImageSourceCreateThumbnailFromImageAlways: true
]

let thumbnail = try {
guard let imageSource = CGImageSourceCreateWithURL(url as CFURL, nil) else { throw RenderingError.unableToCreateImageSource }
guard let scaledImage = CGImageSourceCreateThumbnailAtIndex(imageSource, 0, options as CFDictionary) else { throw RenderingError.unableToCreateThumbnail }
return scaledImage
}()

let rect = CGRect(x: 0,
y: -size.height,
width: size.width,
height: size.height)

let resizedImage = renderer.image { ctx in

let context = ctx.cgContext
context.scaleBy(x: 1, y: -1)
context.draw(thumbnail, in: rect)
}

return resizedImage
}
}

在业务中使用

1
2
3
4
5
6
7
8
9
10
11
12
13
let size = CGSize(width: 100, height: 100)

let iv = UIImageView(frame: .init(x: 100, y: 400, width: 100, height: 100))
view.addSubview(iv)

let imagePath = Bundle.main.path(forResource: "image", ofType: "jpg")!
let imageUrl = URL(fileURLWithPath: imagePath)

//iv.image = UIImage(contentsOfFile: imagePath)

if let image = try? UIGraphicsRenderer.renderImagesAt(url: imageUrl, size: size, scale: 4) {
iv.image = image
}

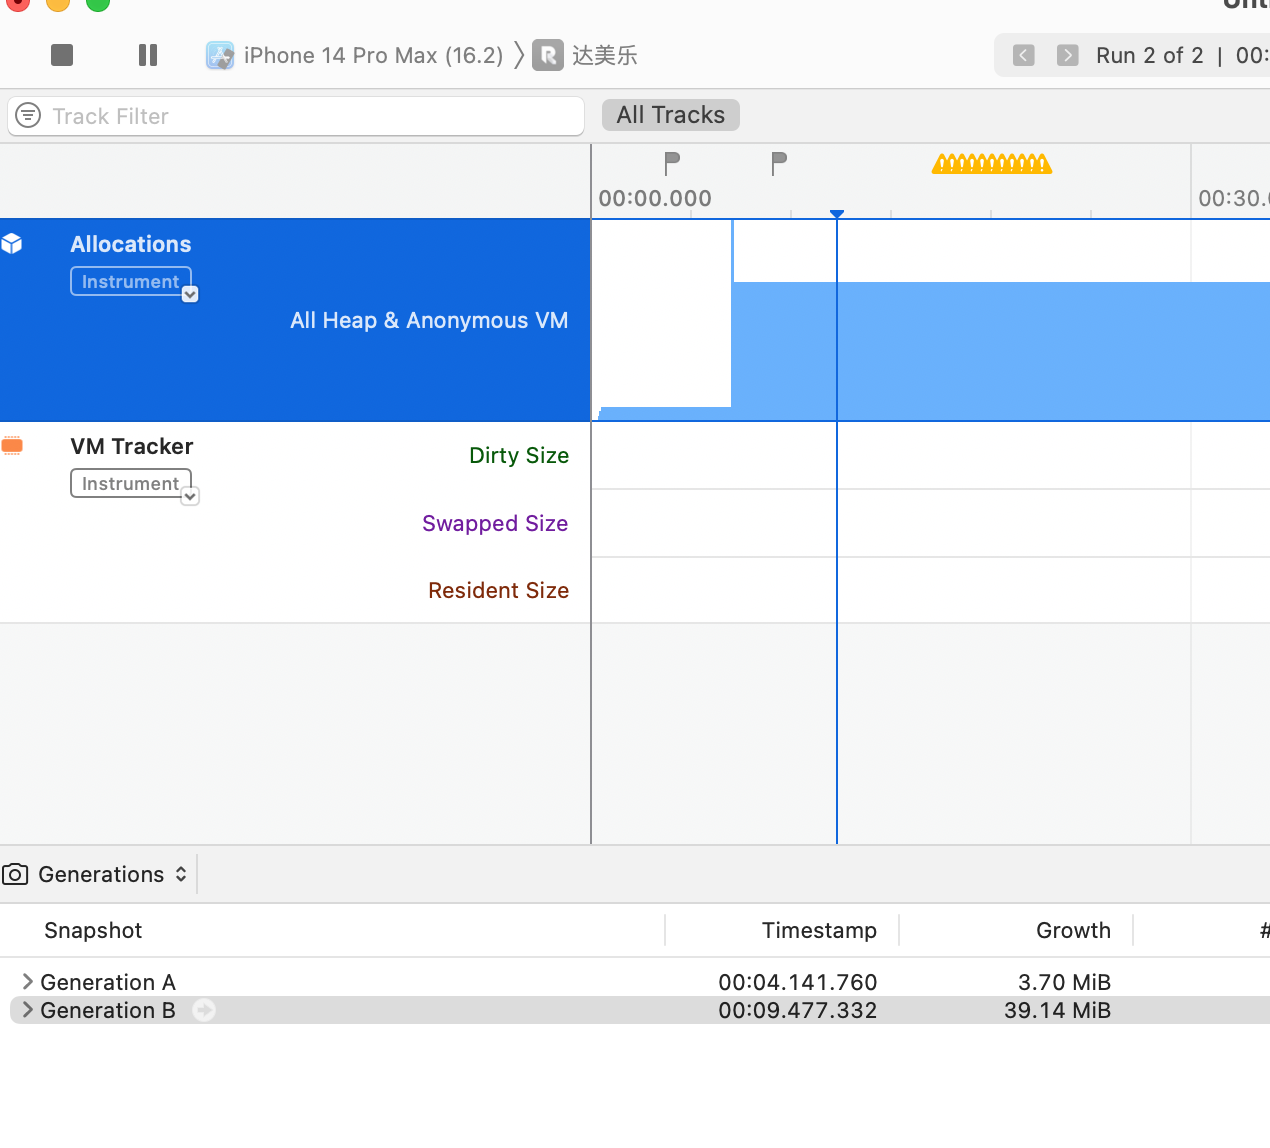
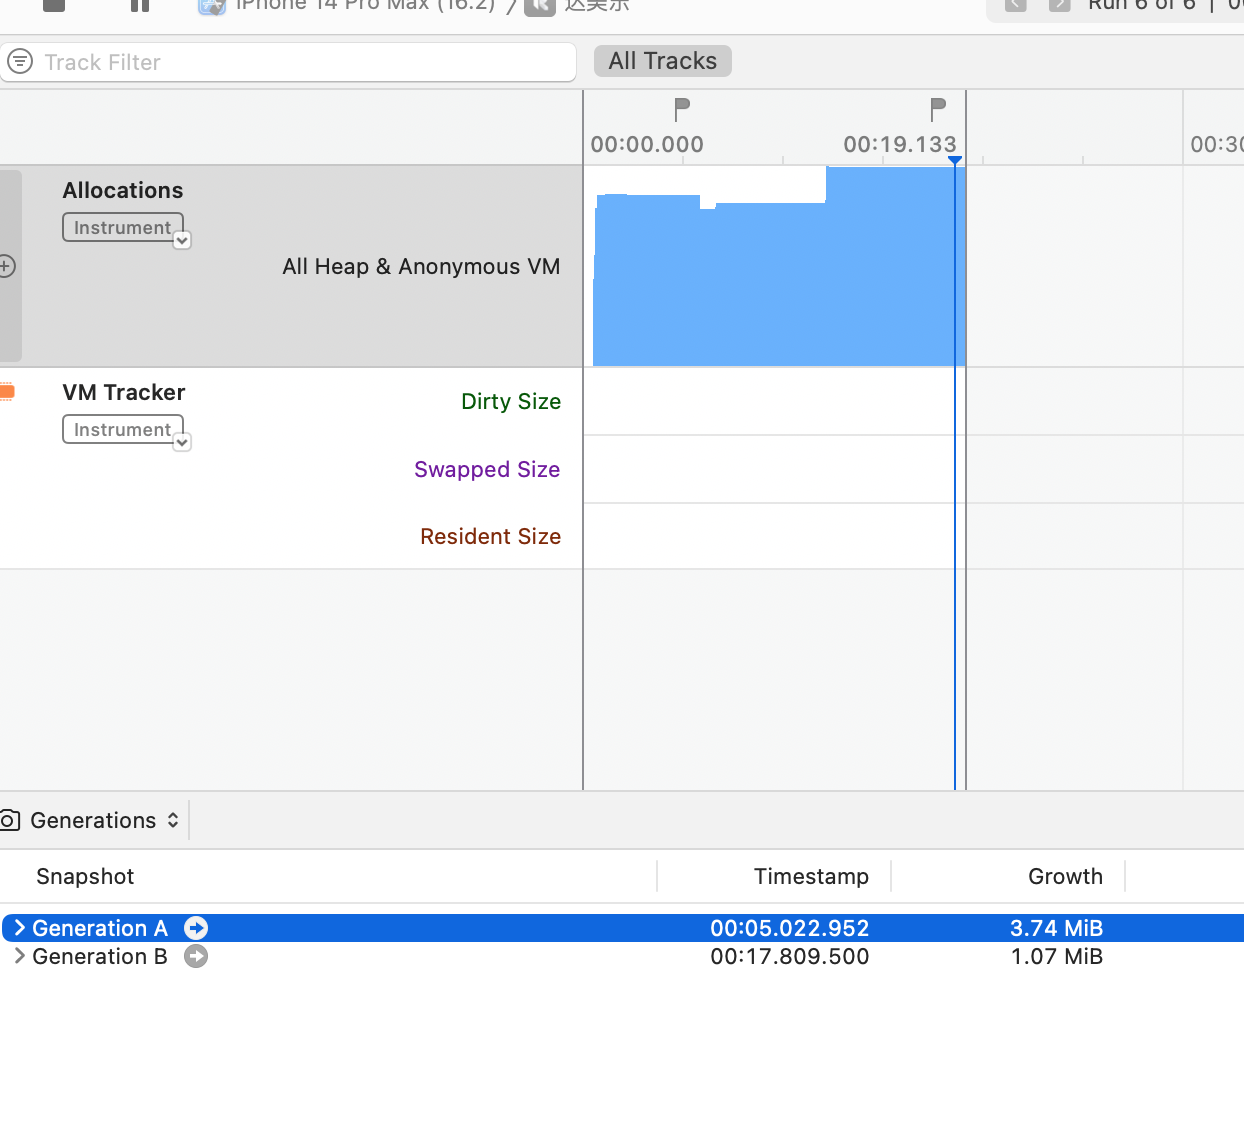
这里 scale 使用4会更接近我们原先看到的图片,但是内存占用大幅下降

当然这样的处理会增加 CPU 的工作量,这个方法在使用 UIImage(contentsOfFile:)进行图片加载时,执行消耗大概在 0.03s,而使用 ImageIO对图片增加了下采样处理,导致此方法耗时 0.09s

对没有使用中的资源进行释放

尤其是在App进入后台后,如果尽量降低App内存,那么会增加不被系统杀死的概率。

消除内存泄漏

在开发阶段注意循环引用并使用 Xcode 和 Instruments 来定位内存泄漏。

一些循环引用很隐蔽,比如:

1
2
3
4
5
6
7
8
9
10
11
12
13
14
15
16
17
18
19
20
21
22
class TestLeak {
deinit {
print("\(self) deinit")
}
var fun: (() -> Void)? = nil

func setFun() {
fun = fun2
}

func setFun1() {
fun = TestLeak.fun3
}

func fun2() {
print("fun2")
}

class func fun3() {
print("fun3")
}
}
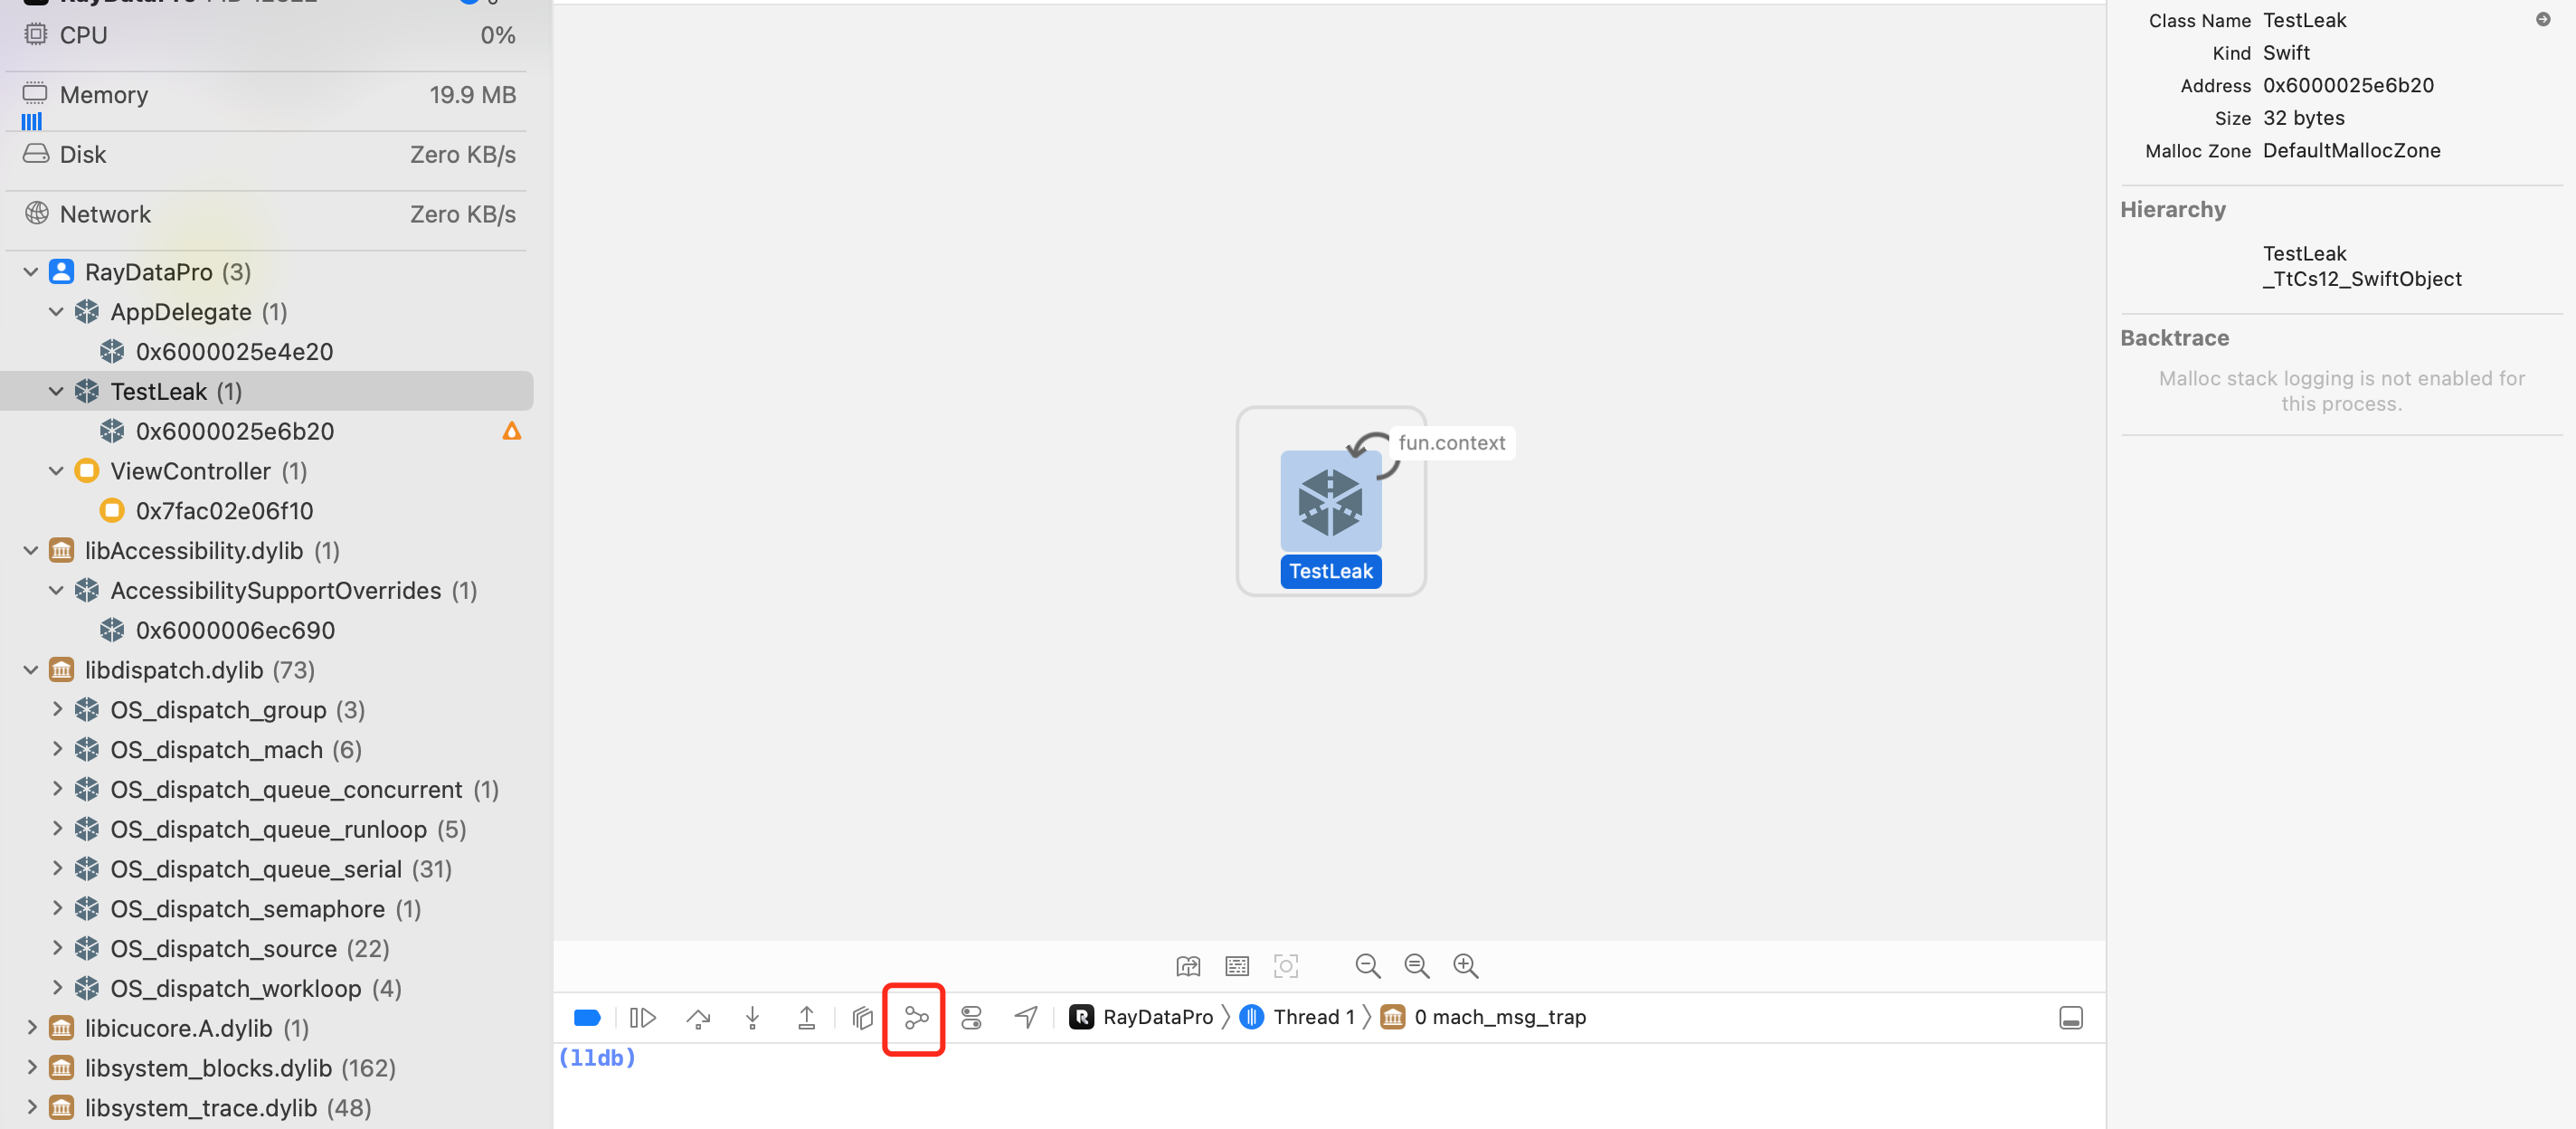
在调用 setFunfun 赋值后,因为 fun2 是实例方法,所以fun会隐式的去捕获 self,以防止 fun2 被释放,而给 fun 赋值 fun3 并不会出现循环引用的问题。

使用 XcodeMemory Graph 可以监测到内存泄漏

在出现内存警告时候,进行清理

内存警告会通过 applicationDidReceiveMemoryWarningdidReceiveMemoryWarningUIApplicationDidReceiveMemoryWarningNotification 通知来告诉 App,所以在需要处理的位置来实现这些回调

释放尽可能多的内存,让应用程序有机会继续运行,卸载不可见的视图控制器,释放图像,模型文件,任何你能想到的东西

但是不要去轻易去释放基于 Dictionary Array 缓存的数据,因为内存压缩的存在,在收到内存警告之前,这些内存会被压缩,再使用的时候再解压,所以如果去释放内部的数据,会在使用前被解压缩,这会与想做的事情相违背,可以看下这个2018 WWDC

在项目的实际运行中,发现有用户创建了大量视图,多达4000多,在进入项目的时候一次性创建不仅会消耗大量内存,还会卡顿,所以需要对这部分进行优化。

优化的方向分为

1、加载策略优化

项目中的 View 并不是同时全部可见的,有很多初始状态是隐藏,所以在加载的时候遇到是隐藏状态的,全部加入延时队列

即使如此,第一批需要初始化的 View 依然很多,由于与 Layer 相关的操作只能在主线程进行,所以尽量把需要计算的操作提前计算缓存。

然后分批次初始化 View ,虽然有一定耗时,但是配合加载动画可以有效避免卡死带来的影响。

2、绘制层优化

由于大部分的控件都是不会被添加点击事件的,也不存在动态添加时间,所以初始化的时候没有事件的都使用 Layer 进行显示,可以极大的缩减内存占用与初始化速度

3、控件的存储

在项目中控件之间有很多层,事件的交互通过对应的 ID 来存储,所以直接使用 Dictionary,它本质是一个散列表,所以存取操作的时间复杂度基本处于 O(1) 级别,内部的桶内只存储控件的指针,一个只有8字节,所以不会占用多少内存。

4、控件的复用

在一个项目详情页,会有多个场景与页,控件只属于某一个场景下的某一页,这样在进行切页操作的时候,如果将之前的控件全部释放,再创建新的,那么会造成很大的性能浪费,所以在首页加载完毕后,所有控件都进行缓存,切页后,控件全部从屏幕移除,从缓存中取对应类型的控件进行新的model赋值操作,进行复用,这样可以节省下释放内存与分配内存所消耗的内存,缺点是会造成一定的内存浪费,但是运行效率优化,基本都是空间换时间。

5、透明度 图片 圆角

因为项目底下是 Unity 的 3D 页面,所以上面的试图除了用户主动设置不透明色,否则都是透明、半透明的,所以这透明上没法像普通列表页这种做优化。

图片都是网络图片,下载到分辨率超出 4K 的图片,进行压缩,如果图片控件设有圆角,直接将图片进行裁剪,这部分操作都处于子线程,最终将处理完解码后的图片在主线程进行绘制。

后续的优化

虽然现在已经不会把 UI 卡死,但是首次进入项目大批量的创建控件,还是会消耗 1 - 4 秒的时间,内存占用也比较高,所以接下来准备将大量没有动画的 layer 进行合并,最终可能会 十几个、几十上百个 Layer 合并成一个大的 Layer。

ANR(Application Not Responding)应用程序无相应,就是我们常说的卡顿。直接原因可以是主线程阻塞,无法在规定时间内完成画面的渲染以及事件的响应。在开发过程中,遇到的造成主线程阻塞的原因可能是:

  • 主线程在进行大量I/O操作:为了方便代码编写,直接在主线程去写入大量数据;
  • 主线程在进行大量计算:代码编写不合理,主线程进行复杂计算;
  • 大量UI绘制:界面过于复杂,UI绘制需要大量时间;
  • 主线程在等锁:主线程需要获得锁A,但是当前某个子线程持有这个锁A,导致主线程不得不等待子线程完成任务。

针对这些问题,如果我们能够捕获得到卡顿当时应用的主线程堆栈,那么问题就迎刃而解了。有了堆栈,就可以知道主线程在什么函数哪一行代码卡住了,是在等什么锁,还是在进行I/O操作,或者是进行复杂计算。有了堆栈,就可以对问题进行针对性解决。

监测原理

页面的绘制以及事件的处理,都是由主线程的 Runloop 来控制,Runloop 在一个循环的各个重要阶段都会给注册的 Observer 发送通知,可以注册对应的通知来获取一次循环 各个阶段的耗时,一次循环的耗时超过阈值,就会出现掉帧 卡顿。

1
2
3
4
5
6
7
8
9
10
11
12
13
14
15
16
17
18
19
20
21
22
23
24
25
26
27
28
29
30
31
32
33
34
35
36
37
38
39
40
41
42
43
let beginObserver = CFRunLoopObserverCreateWithHandler(kCFAllocatorDefault, CFRunLoopActivity.allActivities.rawValue, true, .min) { observer, activity in
switch activity {
case .entry:
print("entry")
case .beforeSources:
print("source")
case .beforeTimers:
print("timer")
case .afterWaiting:
gettimeofday(&self.tvStart, nil)
print("awake")
case .beforeWaiting:
print("sleep")
default:
print("def")
}

}

let endObserver = CFRunLoopObserverCreateWithHandler(kCFAllocatorDefault, CFRunLoopActivity.allActivities.rawValue, true, .max) { observer, activity in
switch activity {
case .entry:
print("2 entry")
case .beforeSources:
print("2 source")
case .beforeTimers:
print("2 timer")
case .afterWaiting:
print("2 awake")
case .beforeWaiting:

// check
var tvCur = timeval()
gettimeofday(&tvCur, nil)
let duration = self.getDuration(tvStart: self.tvStart, tvEnd: tvCur)
print("2 sleep", duration)
default:
print("2 def")
}
}

CFRunLoopAddObserver(CFRunLoopGetCurrent(), beginObserver, .commonModes)
CFRunLoopAddObserver(CFRunLoopGetCurrent(), endObserver, .commonModes)

打印结果,可以看到每次从唤醒到休眠消耗的时间,单位是微妙:

1
2
3
4
5
6
7
8
9
10
11
12
13
14
15
16
17
18
19
20
21
22
23
24
25
26
27
28
29
30
31
32
33
34

awake
2 awake
timer
2 timer
source
2 source
sleep
2 sleep 6739
awake
2 awake
timer
2 timer
source
2 source
sleep
2 sleep 189
awake
2 awake
timer
2 timer
source
2 source
sleep
2 sleep 2057
awake
2 awake
timer
2 timer
source
2 source
sleep
2 sleep 169

输出时间是微秒,上面输出最高 6739 为 6.7 毫秒

当然如果主线程卡住了,那么这种 observe 的回调也会被卡住,如果直接卡到程序崩溃,那么这次超长时间的卡顿就无法被检测到,所以需要启动一条常驻子线程,每隔一段时间获取状态,如果发现主线程卡住超过一定时间,就判定为发生了 ANR,开始获取所有线程当的调用栈、CPU使用率等数据保存至文件。

一个初步的监测类:

1
2
3
4
5
6
7
8
9
10
11
12
13
14
15
16
17
18
19
20
21
22
23
24
25
26
27
28
29
30
31
32
33
34
35
36
37
38
39
40
41
42
43
44
45
46
47
48
49
50
51
52
53
54
55
56
57
58
59
60
61
62
63
64
65
66
67
68
69
70
71
72
73
74
75
76
77
78
79
80
81
82
83
84
85
86
87
88
89
90
91
92
class DetectorMainThread {
static let shared = DetectorMainThread()

private var isRunning = false

@Protected
private var isMainRunloopBegain = false

private var tvStart: timeval = timeval()

private let unfairLock: os_unfair_lock_t
private let queue = DispatchQueue(label: "DetectorMainThread_Queue", attributes: .concurrent)
private let semaphore = DispatchSemaphore(value: 0)

private init() {
unfairLock = .allocate(capacity: 1)
unfairLock.initialize(to: os_unfair_lock())

registMainRunloopObserver()
}

func start() {
os_unfair_lock_lock(unfairLock)

if isRunning {
os_unfair_lock_unlock(unfairLock)
return
}

isRunning = true
os_unfair_lock_unlock(unfairLock)

queue.async {

while self.getIsRunning() {
self.queue.asyncAfter(deadline: .now() + 1) {
self.semaphore.signal()
}

self.semaphore.wait()

self.check()
}
}
}


func stop() {
os_unfair_lock_lock(unfairLock)
isRunning = false
os_unfair_lock_unlock(unfairLock)
}

func getIsRunning() -> Bool {

os_unfair_lock_lock(self.unfairLock)
var isRunning = self.isRunning
os_unfair_lock_unlock(self.unfairLock)

return isRunning
}


private func check() {
$isMainRunloopBegain.read {
if $0 {
var tvCur = timeval()
gettimeofday(&tvCur, nil)
let duration = getDuration(tvStart: tvStart, tvEnd: tvCur)

print("ANR: \(Float(duration) / 1000)ms")
}
}
}


private func registMainRunloopObserver() {
let beginObserver = CFRunLoopObserverCreateWithHandler(kCFAllocatorDefault, CFRunLoopActivity.afterWaiting.rawValue, true, .min) { observer, activity in
gettimeofday(&self.tvStart, nil)
self.$isMainRunloopBegain.write { $0 = true }
}

let endObserver = CFRunLoopObserverCreateWithHandler(kCFAllocatorDefault, CFRunLoopActivity.beforeWaiting.rawValue, true, .max) { observer, activity in
self.$isMainRunloopBegain.write { $0 = false }
}

CFRunLoopAddObserver(CFRunLoopGetMain(), beginObserver, .commonModes)
CFRunLoopAddObserver(CFRunLoopGetMain(), endObserver, .commonModes)
}
}

有时候一次runloop的耗时过长 可能是由于此次runloop之前的循环引起的,所以一般来说会一直记录10-20次的最近调用栈。

项目中使用的网络库为 Alamofire ,数据映射库为 ObjectMapper ,由于项目中存在的网络库使用不够友好,维护扩展新的接口比较繁琐,所以抽空重写了一个网络库的封装

基本框架方案的选择

旧的网络库框架使用了单例与扩展的模式,在使用中的形式为 API.requestAAPI.requestA 的形式,随着接口的增多,API 类下的方法日益增多,显得一团乱。所以接口的调用形式改为 Protocol ,哪里使用哪个模块的接口,就遵循对应模块的 API 协议,不再暴露所有API接口在整个项目中。

一般在业务调用接口的时候,希望处理数据的地方也是在当前位置(当然异步的回调放哪里都一样),这样的代码在后续的维护中更好找到业务逻辑,所以回调统一使用闭包,放弃 Target Select 模式。

基础请求 protocol 的创建

我们以最基础的 HTTP 请求举例

1
2
3
4
protocol API {
func request()
}

由于这是总的请求入口,那么需要传入各个请求需要使用的参数,这些又是跟业务相关的东西,那么应该封装在一起,这里传入的参数,只需要能获取到对应需要的各个值,不限定传入的参数类型,那么请求参数也设计成一个 Protocol

然后超时时间,对于这个参数,可能同一个接口在不同位置所需的时间会不一致,所以作为一个保留参数,提供默认值(由于协议的声明不是设置默认值,所以放在 extension 中),现在代码看起来是这样:

1
2
3
protocol API {
func request(config: ApiConfigProtocol, timeoutInterval: TimeInterval)
}

我们还需要集成数据映射,在请求返回数据初步处理之后,那么还需要一个泛型,因为映射的方法也属于一个协议,所以我们需要泛型遵循此协议,请求返回的闭包,参考 Alamofire 的方式,也以返回一个对象的形式来实现串行闭包:

1
2
3
4
5
protocol API {
func request<T: APIMappable>(
config: ApiConfigProtocol,
timeoutInterval: TimeInterval) -> Response<T>
}

现在所有请求需要和返回的要素有了,我们开始构建

构建 APIMappable

这里我们自定义一个 protocol,基于 ObjectMapperBaseMappable 协议

1
2
3
4
5
6
7
8
9
10
11
12
13
14
15
16
17
18
19
20
21
22
23
24
25
26
27
28
29
protocol APIMappable: BaseMappable {
init?(json: Any?)
}

extension APIMappable {
public init?(map: Map) { self.init(json: nil) }

init?(json: Any?) {
guard let JSON = json as? [String: Any],
let obj: Self = Mapper().map(JSON: JSON) else {
return nil
}

self = obj
}
}

extension Array: APIMappable, BaseMappable where Element: BaseMappable {
public mutating func mapping(map: ObjectMapper.Map) {}

init?(json: Any?) {
if let JSONArray = json as? [[String: Any]] {
let obj: [Element] = Mapper(context: nil).mapArray(JSONArray: JSONArray)
self = obj
} else {
return nil
}
}
}

构建 ApiConfigProtocol

域名与header一般来说比较固定,就直接在extension中返回默认值,它看起来像这样:

1
2
3
4
5
6
7
8
9
10
11
12
13
14
15
16
17
18
19
20
21
22
23
24
25
26
protocol ApiConfigProtocol {
/// 域名
var domain: String {get}
/// 路径
var path: String {get}
/// 请求方法
var method: HTTPMethod {get}
/// 请求头
var header: HTTPHeaders { get }
/// 请求参数
var parameters: [String: Any]? { get }
/// 参数编码
var encoder: ParameterEncoding {get}
}

extension ApiConfigProtocol {
var domain: String { "https://xxxx.com" }
var header: HTTPHeaders { defaultHeader() }


func defaultHeader() -> HTTPHeaders {
var dic = [String: String]()
dic["token"] = "xxxx"
return HTTPHeaders.init(dic)
}
}

在实际使用中,对应的业务模块实现该协议,例如一个与服务系统相关的模块:

1
2
3
4
5
6
7
8
9
10
11
12
13
14
15
16
17
18
19
20
21
22
23
24
25
26
27
28
29
30
31
32
33
34
35
36
37
38
39
40
41
42
43
enum APISystemConfig: ApiConfigProtocol {
case sysTime
case sysVersion

var path: String {
switch self {
case .sysTime: return "/sysTime"
case .sysVersion: return "/sysVersion"
}
}

var header: HTTPHeaders {
var defaultHeader = defaultHeader()

switch self {
case .sysTime: return defaultHeader
case .sysVersion:
defaultHeader.add(name: "platform", value: "ios")
return defaultHeader
}
}

var method: HTTPMethod {
switch self {
case .sysTime: return .get
case .sysVersion: return .post
}
}

var parameters: [String : Any]? {
switch self {
case .sysTime: return [:]
case .sysVersion: return ["appVersion": "1.0.0"]
}
}


var encoder: ParameterEncoding {
switch self {
case .sysTime, .sysVersion: return JSONEncoding.default
}
}
}

构建 Response

此类需要管理众多闭包,以便于接口返回后的处理:

1
2
3
4
5
6
7
8
9
10
11
12
13
14
15
16
17
18
19
20
21
22
23
24
25
26
27
28
29
30
31
32
33
34
35
36
37
38
class Response<T: APIMappable> {
init() {}
weak var request: DataRequest?
func cancel() {
request?.cancel()
}

typealias successBlock = (T) -> Void
typealias errorBlock = (APIError) -> Void


private var successBlocks = [successBlock?]()
private var errorBlocks = [errorBlock?]()


fileprivate func postSuccess(_ model: T) {
successBlocks.forEach {$0?(model)}
}

fileprivate func postError(_ error: APIError) {
errorBlocks.forEach {$0?(error)}
}


@discardableResult
func success(_ completionHandler: successBlock?) -> Self {
modelBlocks.append(completionHandler)
return self
}


@discardableResult
func error(_ completionHandler: errorBlock?) -> Self {
errorBlocks.append(completionHandler)
return self
}
}

搭建Model框架

假如我们的服务器数据为

1
2
3
4
5
6
7
8
{
"code": 200,
"message": "no message",
"data": {
"time": 2942798372937
}

}

data是我们想要的业务数据,codemessage 是用来处理接口的返回逻辑的,我们的 Response Model为:

1
2
3
4
5
6
7
8
9
10
11
12
13
14
15
16
17
18
19
class ResponseModel: APIMappable {
var code = 0
var message = ""
var data: Any? = nil


func mapping(map: ObjectMapper.Map) {
code <- map["code"]
message <- map["message"]
data <- map["data"]
}
}

class SysTimeModel: APIMappable {
var time: TimeInterval = 0
func mapping(map: ObjectMapper.Map) {
time <- map["time"]
}
}

实现请求逻辑

1
2
3
4
5
6
7
8
9
10
11
12
13
14
15
16
17
18
19
20
21
22
23
24
25
26
27
28
29
30
31
32
33
34
35
36
37
38
39
40
41
42
43
44
45
46
47
48
extension API {
func request<T: APIMappable>(
config: ApiConfigProtocol,
timeoutInterval: TimeInterval = 20) -> Response<T> {
let result = Response<T>()

let request = AF.request(config.domain + config.path,
method: config.method,
parameters: config.parameters,
encoding: config.encoder,
headers: config.header
) {$0.timeoutInterval = timeoutInterval}


request.responseData { res in
switch res.result {
case .success(let data):
if let JSON = try? JSONSerialization.jsonObject(with: data, options: JSONSerialization.ReadingOptions.allowFragments),
let model = ResponseModel(json: JSON) {

switch model.code {
case 200:
if let model = T.init(json: JSON) {
result.postSuccess(model)
} else {
result.postError(APIError(message: "解析错误 \(model.message)"))
}
case 401:
print("token失效")
// loginOut()
default:
result.postError(APIError(message: "未知错误 \(model.message)"))
}

} else {
result.postError(APIError(message: "JSON解析错误"))
}

case .failure(let error):
result.postError(APIError(message: error.localizedDescription))
}
}

result.request = request

return result
}
}

封装业务

1
2
3
4
5
6
7
8
9
10
11
protocol SystemAPI: API {}
extension SystemAPI {
func getSysTime() -> Response<ResponseModel> {
return request(config: APISystemConfig.sysTime)
}

func getSysVersion() -> Response<[ResponseModel]> {
return request(config: APISystemConfig.sysVersion)
}
}

使用

1
2
3
4
5
6
7
8
9
10
11
12
13
14
15
16
17
18
19
20
21
22
23
24
25
26
27
28
29
extension ViewController: SystemAPI {
func getData() {

getSysTime()
.success { model in
print("model", model.time)
}
.success { model in
print("this model is", model)
}
.error { err in
print("err", err.message)
}


let getSysVersionTask = getSysVersion()


getSysVersionTask.success { list in
list.forEach {print("list model _", $0.time)}
}

getSysVersionTask.error { err in

}

getSysVersionTask.cancel()
}
}

面向协议编程 (Protocol Oriented Programming,以下简称 POP) 是 Apple 在 2015 年 WWDC 上提出的 Swift 的一种编程范式。相比与传统的面向对象编程 OOP,POP 显得更加灵活。

Swift 的标准库使用了大量的协议,整个iOS/MacOS库使用了大量协议来搭建框架。

面向对象的特点

构建一个模块的框架,在面向对象中会抽取出公共父类

1
2
3
4
5
6
7
8
9
10
11
12
13
14
15
16
17
18
19
20
21
22
23
24
25
26
27
28
29
30
31
class Person {
var age = 0
var name = ""

func sayName() {
print("my age is \(name)")
}

func eat() {
print("eat food.")
}
}


class Student: Person {
override func eat() {
print("eat Person meal")
}
}

class Teacher: Person {
var salary = 0.0

override func eat() {
print("eat Teacher meal")
}

func getPaid() {
print("this month get paid: \(salary)")
}
}

我们可以看到父类持有共同的属性与方法,子类可以自由决定是否重写,比如 Person 中的 sayName 方法,子类无需再次实现,只需要继承即可使用,增加代码的复用率。

我们还有一个属性 salary 薪资,以及领工资的行为,并不是所有人都有薪资以及领工资的行为,所以目前就单独放在 Teacher 中。

这个时候这个模块很完美,没有多余的代码,结构清晰。

接下来某一天新增一个需求,需要一个厨师,也有 Person 的所有特质,那么理所当然应该继承自 Person

1
2
3
4
5
6
class Cook: Person {
override func eat() {
print("Cook eat")
}
func Salary() { }
}

但是厨师也应该有薪资以及领工资行为,从Teacher复制一份到Cook显然不是我们想要的,如果放在Person里共用,又会超出Person应该承受的范围,会导致比如Student继承一些用不到的属性和方法,那么按照面向对象的思想,我们应该在TeacherCookPerson 中间增加一层:

1
2
3
4
5
6
7
8
9
10
11
12
13
14
15
16
17
18
class Workers: Person {
var salary = 0.0
func getPaid() {
print("this month get paid: \(salary)")
}
}

class Teacher: Workers {
override func eat() {
print("eat Teacher meal")
}
}

class Cook: Workers {
override func eat() {
print("Cook eat")
}
}

这样从 OOP 的思想上完美解决问题,但是这种改动会涉及到原先的继承框架,需要改动原来的继承关系,显然会增加不确定性与繁琐性,而且 Swift 中的继承只有单继承,所以如果完全靠 OOP 的范式去维护框架,只有这一条路。

使用协议与扩展解决上诉问题

一个简单的协议与扩展:

1
2
3
4
5
6
7
8
9
10
11
12
13
14
15
16
17
protocol PersonProtocol {
var age: Int {set get}
var name: String {set get}

func sayName()
func eat()
}

extension PersonProtocol {
func sayName() {
print("my age is \(name)")
}

func eat() {
print("eat food.")
}
}

所有遵循此协议的类都必须包含对应的属性与方法,协议扩展实现的方法,会变成可选方法,到这里就完全可以用 PersonProtocol 来代替 Person类,再用WorkersProtocol代替 Workers类:

1
2
3
4
5
6
7
8
9
10
protocol WorkersProtocol: PersonProtocol {
var salary: Float { set get }
func getPaid()

}
extension WorkersProtocol {
func getPaid() {
print("this month get paid: \(salary)")
}
}

现在的三种类将会变成:

1
2
3
4
5
6
7
8
9
10
11
12
13
14
15
16
17
18
19
20
21
22
23
24
25
26
27
28
29
class Student: PersonProtocol {
var age: Int = 0
var name: String = ""

func eat() {
print("eat Person meal")
}
}


class Teacher: WorkersProtocol {
var age: Int = 0
var name: String = ""
var salary: Float = 0.0

func eat() {
print("eat Teacher meal")
}
}

class Cook: WorkersProtocol {
var age: Int = 0
var name: String = ""
var salary: Float = 0.0

func eat() {
print("Cook eat")
}
}

这个时候的类,只需要遵循自己需要的协议,就可以变相继承公共的属性和方法,脱离出 OOP 的框架,对框架的扩展与维护增加的极大的便利。

而且这个时候对于不同的继承系列里相同的特征,也可以用协议来实现代码的复用与框架的扩展合理性

当然并不是要完全抛弃 OOP,他们各有长处, 应该配合来使用。

React Native (一):基础

React Native (二):StatusBar 、 NavigationBar 与 TabBar

React Native (三):自定义视图

React Native (四):加载新闻列表

React Native (五):上下拉刷新加载

React Native (六):加载所有分类与详情页

1.加载全部分类新闻

我们需要做的效果是打开 App ,首先只加载第一页的数据,其他页面在第一次显示的时候加载数据。

我们需要一个状态来标明是不是第一次显示,给 state 加入 isFirstShow: true,我们在网络请求里给他赋值为 false

在做的过程中发现一个问题,我们需要取到它的 EndKey 来作为下次请求的 StartKey ,否则可能会请求失败,给 state 加入 startKey: '' ,然后在请求到数据后赋值:

1
2
3
4
5
6
7
8
9
10
11
12
13
14
15
16
17
18
19
20
21
22
23
24
25
26
27
28
29
30
31
32
33
34
35
36
37
38
39
40
41
42
43
44
45
46
47
48
49
50
51
52
53
54
55
56
57
58
59
60
61
62
63
64
65
66
67
68
69
70
71
72
73
74
75
76
77
78
79
80
81
82
83
 _onRefresh(page) {
this.setState({
isFirstShow: false
})

if (this.props.dic) {

this._begainRefresh()

if (page == 1) {
this.setState({
page
})
} else {
page = this.state.page
}

let url = 'http://api.iapple123.com/newspush/list/index.html?clientid=1114283782&v=1.1&type='
+ this.props.dic.NameEN
+ '&startkey='
+ this.state.startKey
+'&newkey=&index='
+ page
+ '&size='
+ maxCount
+ '&ime=6271F554-7B2F-45DE-887E-4A336F64DEE6&apptypeid=ZJZYIOS1114283782'

LOG('url=》', url)
fetch(url, {
method: 'GET',
headers: {
'Accept': 'application/json',
'Content-Type': 'application/json',
},
})
.then((res) => {

this._endRefresh()

res.json()
.then((json) => {

let list = json.NewsList


let swipers = []
let news = []

if (page == 1) {
for (let index in list) {
let dic = list[index]
index < 4 ? swipers.push(dic) : news.push(dic)
}
news.splice(0, 0, swipers)
} else {
news = list
}

let newData = this.state.data.concat(news)

let hasMore = list.length == maxCount ? true : false

this.setState({
dataSource: this.state.dataSource.cloneWithRows(newData),
data: newData,
page: this.state.page + (hasMore ? 1 : 0),
showFooter: this.state.showFooter ? true : (hasMore ? true : false),
hasMore,
startKey: json.EndKey ? json.EndKey : this.state.startKey
})
})
.catch((e) => {
LOG('GET ERROR then =>', url, e)

})
})
.catch((error) => {
this._endRefresh()
LOG('GET ERROR=>', url, '==>', error)
})
}
}

然后返回我们的 Home.js ,在这里处理是否请求数据:

首先给 NewsList 加上 ref

1
2
3
4
5
6
7
8
9
10
11
12
lists.push(
<NewsList
ref={'NewsList' + index}
key={index}
style={{backgroundColor:'white', width: width, height: height - 64 - 49 - 30}}
dic={dic}
isRequest={index == 0}
touchIn={(scrollEnabled) => {
this.refs.ScrollView.setNativeProps({scrollEnabled: !scrollEnabled})
}}
/>
)

然后在点击 SegmentedView 和滑动 ScrollView 的时候来进行处理:

1
2
3
4
5
6
7
8
9
10
11
12
13
14
15
16
17
18
19
20
21
22
23
<SegmentedView
ref="SegmentedView"
list={this.state.list}
style={{height: 30}}
selectItem={(index) => {
this.refs.ScrollView.scrollTo({x: width * index, y: 0, animated: true})
this._scrollTo(index)
}}
/>

<ScrollView
removeClippedSubviews={Platform.OS === 'ios'}
style={styles.view}
ref="ScrollView"
horizontal={true}
showsHorizontalScrollIndicator={false}
pagingEnabled={true}
onMomentumScrollEnd={(s) => {
let index = s.nativeEvent.contentOffset.x / width
this.refs.SegmentedView._moveTo(index)
this._scrollTo(index)
}}
>

如果是第一次显示,那么请求数据:

1
2
3
4
_scrollTo(index) {
let newsList = this.refs['NewsList' + index]
newsList.state.isFirstShow && newsList._onRefresh()
}

2.详情页

详情页进去是一个网页,我们直接写死一个网页。

创建 NewsDetail.js

1
2
3
4
5
6
7
8
9
10
11
12
13
14
15
16
17
18
19
20
21
22
23
24
25
26
27
28
29
30
31
32
33
34
35
36
import React from 'react'

import {
View,
Text,
StyleSheet,
WebView
} from 'react-native'

import NavigationBar from '../Custom/NavBarCommon'

export default class NewsDetail extends React.Component {
render() {
return (
<View style={styles.view}>
<NavigationBar
title="详情页"
navigator={this.props.navigator}
/>
<WebView
style={{flex:1}}
source={{uri: 'http://zjzywap.eastday.com/m/170425001829725.html?fr=toutiao&qid=zjxw&apptypeid=ZJZYIOS1114283782&ime=6271F554-7B2F-45DE-887E-4A336F64DEE6'}}
/>

</View>
)
}
}


const styles = StyleSheet.create({
view: {
flex:1,
backgroundColor: 'white'
}
})

然后我们去 NewsList.js 引入:

1
import NewsDetail from './NewsDetail'

然后我们需要进行 push :

1
2
3
4
5
6
7
8
_onPress() {
this.props.navigator && this.props.navigator.push({
component: NewsDetail,
params: {
navigator: this.props.navigator, //这个并不用传入, 这里只是为了演示参数的传入
}
})
}

我们 push 需要用到 navigator, 但是的 NewsList 我们并没有给它传入 navigator ,我们需要去 Home.js

1
2
3
4
5
6
7
8
9
10
11
<NewsList
ref={'NewsList' + index}
key={index}
style={{backgroundColor:'white', width: width, height: height - 64 - 49 - 30}}
dic={dic}
isRequest={index == 0}
touchIn={(scrollEnabled) => {
this.refs.ScrollView.setNativeProps({scrollEnabled: !scrollEnabled})
}}
navigator={this.props.navigator}
/>

然后进行调用

renderRow 方法内的 CarousePicture 以及下面的 2 个 TouchableOpacity 加入属性 onPress={this._onPress}

例如这样:

1
2
3
4
5
6
7
8
<CarousePicture
index={5}
ref="ScrollView"
rowData={rowData}
style={{width, height: 200}}
touchIn={this.props.touchIn}
onPress={this._onPress}
/>

最后我们需要进入 CarousePicture.js 内的 TouchableWithoutFeedback 来调用回调函数:

1
2
3
4
5
6
7
8
9
10
11
12
13
14
 <TouchableWithoutFeedback
style={{flex:1,width, height:200, backgroundColor:'white'}}

onPress={() => {
this.props.onPress && this.props.onPress()
}}
onPressIn={() => {
this.props.touchIn && this.props.touchIn(true)
}}

onPressOut={() => {
this.props.touchIn && this.props.touchIn(false)
}}
>

现在就可以 push 到详情页了

项目地址

React Native (一):基础

React Native (二):StatusBar 、 NavigationBar 与 TabBar

React Native (三):自定义视图

React Native (四):加载新闻列表

React Native (五):上下拉刷新加载

React Native (六):加载所有分类与详情页

1.下拉刷新

下拉刷新我们使用 React Native 提供的组件 RefreshControl,去 NewsList.jsListView 添加:

1
2
3
4
5
6
7
8
9
10
11
12
13
14
15
16
17
<ListView
style={{flex:1, backgroundColor:'white'}}
dataSource={this.state.dataSource} //设置数据源
renderRow={this.renderRow} //设置cell
removeClippedSubviews={false}
refreshControl={
<RefreshControl
refreshing={this.state.isRefreshing}
onRefresh={() => this._onRefresh(1)}
tintColor="#999999"
title="加载中..."
titleColor="#999999"
colors={['#ff0000', '#00ff00', '#0000ff']}
progressBackgroundColor="#ffff00"
/>
}
/>

ListView 新加了一个属性 removeClippedSubviews

原因

我们需要给 state 添加一个 keyisRefreshing: false ,然后在网络请求时对它进行处理,(我这里省略了一些代码,要不然太长)

1
2
3
4
5
6
7
8
9
10
11
12
13
14
15
16
17
18
19
20
21
22
23
24
25
26
27
28
29
30
31
32
33
34
35
36
37
38
39
40
41
42
43
44
45
_begainRefresh() {
this.setState({
isRefreshing: true
})
}
_endRefresh() {
this.setState({
isRefreshing: false
})
}

_onRefresh(page) {
if (this.props.dic) {
this._begainRefresh()

if (page == 1) {
this.setState({
page
})
}
let url = ''

fetch(url, {
method: 'GET',
headers: {
'Accept': 'application/json',
'Content-Type': 'application/json',
},
})
.then((res) => {

this._endRefresh()

res.json()
.then((json) => {
..... 数据的处理
})
.catch((e) => {
})
})
.catch((error) => {
this._endRefresh()
})
}
}

现在运行程序就可以尽情地下拉刷新了。

2.上拉加载

上拉加载我们利用 ListViewonEndReached 方法来进行加载新数据,使用 renderFooter 来进行显示状态。

这样严格的来说并不算上拉加载,只是滑动到底部自动进行加载。

首先在 ListView 加入:

1
2
3
onEndReached={ this._toEnd }
onEndReachedThreshold={10}
renderFooter={ this._renderFooter }

记得进行绑定

1
2
3
this._toEnd = this._toEnd.bind(this)
this._renderFooter = this._renderFooter.bind(this)

实现

1
2
3
4
5
6
7
8
9
10
11
12
_toEnd() {
if (this.state.isRefreshing) return
this._onRefresh()
}

_renderFooter() {
return (
<View style={{width, height: 40, backgroundColor: '#FFFFFF', alignItems:'center', justifyContent:'center'}}>
<Text>正在加载更多...</Text>
</View>
)
}

现在我们需要对数据进行处理,保存请求到的数据,再下一页数据请求到后加入数组,我们给 state 加入一个 data: [],然后对请求到的数据进行处理:

1
2
3
4
5
6
7
8
9
10
11
12
13
14
15
16
17
18
19
20
21
22
23
let list = json.NewsList

let swipers = []
let news = []

if (page == 1) {
for (let index in list) {
let dic = list[index]
index < 4 ? swipers.push(dic) : news.push(dic)
}
news.splice(0, 0, swipers)
} else {
news = list
}

let newData = this.state.data.concat(news)

this.setState({
dataSource: this.state.dataSource.cloneWithRows(newData),
data: newData,
page: this.state.page + (list.length == maxCount ? 1 : 0)
})

这里的 maxCount 是为了方便管理的,定义为:

1
const maxCount = 20

请求的 url 改为 :

1
2
3
4
5
6
7
let url = 'http://api.iapple123.com/newspush/list/index.html?clientid=1114283782&v=1.1&type='
+ this.props.dic.NameEN
+ '&startkey=3001_9223370543834829200_537d522d125e32ae&newkey=&index='
+ page
+ '&size='
+ maxCount
+ '&ime=6271F554-7B2F-45DE-887E-4A336F64DEE6&apptypeid=ZJZYIOS1114283782'

现在可以运行看看效果了。

我们会发现一开始在加载第一页数据的时候 Footer 也显示了出来,我们需要控制它的显示与隐藏,给 state 加入 showFooter: false ,在第一页数据加载完成并且返回的数组元素个数等于 maxCount 则赋值为 true

1
2
3
4
5
6
7
this.setState({
dataSource: this.state.dataSource.cloneWithRows(newData),
data: newData,
page: this.state.page + (list.length == maxCount ? 1 : 0),
showFooter: this.state.showFooter ? true : (list.length == maxCount ? true : false)
})

1
2
3
4
5
6
7
8
9
10
11
_renderFooter() {

if (!this.state.showFooter) {
return null
}
return (
<View style={{width, height: 40, backgroundColor: '#FFFFFF', alignItems:'center', justifyContent:'center'}}>
<Text>正在加载更多</Text>
</View>
)
}

现在 Footer 可以正确的显示隐藏了,但是我们还需要状态来改变 Footer 显示的文字,如果还有更多数据,那我们看见 Footer 的时候它的状态显然是正在加载更多,如果没有更多数据了,那我们就显示 已加载全部 。

state 加入 hasMore: true ,我们先假设它还有更多

然后在请求到数据进行处理:

1
2
3
4
5
6
7
8
9
let hasMore = list.length == maxCount ? true : false

this.setState({
dataSource: this.state.dataSource.cloneWithRows(newData),
data: newData,
page: this.state.page + (hasMore ? 1 : 0),
showFooter: this.state.showFooter ? true : (hasMore ? true : false),
hasMore,
})

然后处理 renderFooter:

1
2
3
4
5
6
7
8
9
10
11
_renderFooter() {

if (!this.state.showFooter) {
return null
}
return (
<View style={{width, height: 40, backgroundColor: '#FFFFFF', alignItems:'center', justifyContent:'center'}}>
<Text>{this.state.hasMore ? '正在加载更多...' : '已加载全部'}</Text>
</View>
)
}

我们还需要再 toEnd 的判断条件加入 hasMore 来避免显示没有更多数据的时候拉倒底部还会进行请求数据:

1
2
3
4
_toEnd() {
if (this.state.isRefreshing || !this.state.hasMore) return
this._onRefresh()
}

到现在上下拉刷新已经完成

这个上拉刷新比较简陋,你也可以放 gif图 或者使用 动画 来让界面变好看点。

项目地址

React Native (一):基础

React Native (二):StatusBar 、 NavigationBar 与 TabBar

React Native (三):自定义视图

React Native (四):加载新闻列表

React Native (五):上下拉刷新加载

React Native (六):加载所有分类与详情页

1.标签与内容页联动

上一节做到了点击标签自动移动,还差跟下面的视图进行联动。

首先创建 NewsList.js :

1
2
3
4
5
6
7
8
9
10
11
12
13
14
15
16
17
18
19
20
21
22
23
24
25
26
27
28
import React from 'react'
import {
View,
Text,
ListView,
Image,
StyleSheet,
Dimensions
} from 'react-native'
const {width, height} = Dimensions.get('window')

export default class NewsList extends React.Component {
render() {
const {style} = this.props
return (
<View style={[styles.view,style]}>

</View>
)
}
}

const styles = StyleSheet.create({
view: {
flex: 1,
backgroundColor:'red'
}
})

然后在 Home.js 引入,再加入 ScrollView ,现在 Home.jsredner() 是这样子的,这里加入的 ScrollView 我们在后文中称为 NewsScrollView

1
2
3
4
5
6
7
8
9
10
11
12
13
14
15
16
17
18
19
20
21
22
23
24
25
26
27
28
render() {
return (
<View style={styles.view}>
<NavigationBar
title="首页"
unLeftImage={true}
/>

<SegmentedView
ref="SegmentedView"
list={this.state.list}
style={{height: 30}}
/>

<ScrollView
style={styles.view}
ref="ScrollView"
horizontal={true}
showsHorizontalScrollIndicator={false}
pagingEnabled={true}
>
{ this._getNewsLists()}
</ScrollView>
</View>
)
}


_getNewsLists() 方法:

1
2
3
4
5
6
7
8
9
10
11
12
13
14
15
16
17
18
19
20
21
22
23
24
25
26
27
28
29
30
_getNewsLists() {
let lists = []
if (this.state.list) {
for (let index in this.state.list) {
let dic = this.state.list[index]
lists.push(
<NewsList
key={index}
style={{backgroundColor:'#' + this._getColor('',0), width: width, height: height - 49 - 64 - 30}}
dic={dic}
/>
)
}
}

return lists
}

_getColor(color, index) {

index ++

if (index == 7) {
return color
}

color = color + '0123456789abcdef'[Math.floor(Math.random()*16)]
return this._getColor(color, index)
}

根据返回的数据创建对应数量的视图,给随机颜色方便看效果。

先设置滑动 NewsScrollView 让标签跟着移动。

我们把 SegmentedViewitems.push 中的 onPress 方法的实现单独写到一个方法里,然后在这里调用:

1
2
3
4
5
6
7
8
9
10
11
12
_moveTo(index) {
const { list } = this.props //获取到 传入的数组

this.state.selectItem && this.state.selectItem._unSelect()
this.state.selectItem = this.refs[index]


if (list.length > maxItem) {
let meiosis = parseInt(maxItem / 2)
this.refs.ScrollView.scrollTo({x: (index - meiosis < 0 ? 0 : index - meiosis > list.length - maxItem ? list.length - maxItem : index - meiosis ) * this.state.itemWidth, y: 0, animated: true})
}
}

这里会发现我们给 this.state 加了一个 itemWidth ,原来我们获取 itemWidth 是在 _getItems() 中计算的,但是在渲染的过程中无法调用 setState() ,我们把计算 itemWidth 的方法移动到 :

1
2
3
4
5
6
7
8
9
10
11
12
13
14
15
16
componentWillReceiveProps(props) {
const { list } = props //获取到 传入的数组
if (!list || list.length == 0) return

// 计算每个标签的宽度
let itemWidth = width / list.length

if (list.length > maxItem) {
itemWidth = width / maxItem
}

this.setState({
itemWidth
})
}

componentWillReceiveProps(props) 方法会在属性更新后调用,参数 props 是新的属性。

现在运行会发现点击标签可以正常改变标签的状态,然而拖动 NewsScrollView 只会让上一个选中的变为未选中,新的标签并没有变为选中,这是因为选中状态只在标签被点击的时候进行了设置,我们需要给 Item 添加一个选中的方法 :

1
2
3
4
5
 _select() {
this.setState({
isSelect: true
})
}

然后在 _moveTo(index) 进行调用:

1
2
3
this.state.selectItem && this.state.selectItem._unSelect()
this.state.selectItem = this.refs[index]
this.state.selectItem._select()

现在运行滑动 NewsScrollView 上面的 SegmentedView 可以正常运行了。

最后设置点击标签可以让 NewsScrollView 滑动到对应的位置,我们需要给 SegmentedView 加入一个回调函数,在标签被点击的时候调用返回点击的 index

1
2
3
4
5
6
7
8
<SegmentedView
ref="SegmentedView"
list={this.state.list}
style={{height: 30}}
selectItem={(index) => {
this.refs.ScrollView.scrollTo({x: width * index, y: 0, animated: true})
}}
/>

SegmentedView 进行调用:

1
2
3
4
5
6
7
8
9
10
11
12
13
14
15
16
17
18
19
20
21
22
23
24
25
26
27
28
29
_getItems() {
const { list, selectItem } = this.props //获取到 传入的数组

if (!list || list.length == 0) return []

let items = []
for (let index in list) {
let dic = list[index]
items.push(
<Item
ref={index}
key={index}
isSelect={index == 0}
itemHeight={this.state.itemHeight}
itemWidth={this.state.itemWidth}
dic={dic}
onPress={() => {
this._moveTo(index)
selectItem && selectItem(index)
}}
/>
)
}


return items
}

2.加载新闻列表第一页数据

Home.js 中已经给 NewsList 传入了数据,我们再给传入一个参数识别是否是第一页,初始只加载第一页的数据,也方便调试:

1
2
3
4
5
6
7
8
9
10
11
12
13
14
15
16
17
18
_getNewsLists() {
let lists = []
if (this.state.list) {
for (let index in this.state.list) {
let dic = this.state.list[index]
lists.push(
<NewsList
key={index}
style={{backgroundColor:'white'}}
dic={dic}
isRequest={index == 0}
/>
)
}
}

return lists
}

然后去 NewsList.js 进行请求数据:

1
2
3
4
5
6
7
8
9
10
11
12
13
14
15
16
17
18
19
20
21
22
23
24
25
26
27
28
29
30
31
32
33
34
35
36
37
38
39
40
41
42
43
44
45
46
47
48
49
50
51
52
53

// 构造
constructor(props) {
super(props);
// 初始状态
this.state = {
page: 1,
rn: 1,
};
}


componentDidMount() {
if (!this.props.isRequest) return
this._onRefresh()
}

_onRefresh(page) {
if (this.props.dic) {
let url = 'http://api.iapple123.com/newspush/list/index.html?clientid=1114283782&v=1.1&type='
+ this.props.dic.NameEN
+ '&startkey=&newkey=&index='
+ (page ? page : this.state.page)
+ '&size=20&ime=6271F554-7B2F-45DE-887E-4A336F64DEE6&apptypeid=ZJZYIOS1114283782&rn='
+ this.state.rn

LOG('url=》', url)
fetch(url, {
method: 'GET',
headers: {
'Accept': 'application/json',
'Content-Type': 'application/json',
},
})
.then((res) => {

res.json()
.then((json) => {
LOG('GET SUCCESSED then =>', url, json)

})
})
.catch((e) => {
LOG('GET ERROR then =>', url, e)

})
})
.catch((error) => {

LOG('GET ERROR=>', url, '==>', error)
})
}
}

请求到数据后我们需要用 ListView (官方文档) 来显示, 所以导入 ListView ,然后去 render() 加入:

1
2
3
4
5
6
7
8
9
10
11
12
render() {
const {style} = this.props
return (
<View style={[styles.view,style]}>
<ListView
style={{flex:1}}
dataSource={this.state.dataSource} //设置数据源
renderRow={this.renderRow} //设置cell
/>
</View>
)
}

然后加入 dataSourcerenderRow:

1
2
3
4
5
6
7
8
9
10
11
12
13
14
15
16
17
18
19
20
21
22
23
24
25
26
27
28
29
30
// 构造
constructor(props) {
super(props);

var getRowData = (dataBlob, sectionID, rowID) => {

return dataBlob[sectionID][rowID]
};
// 初始状态
this.state = {

page: 1,
rn: 1,
dataSource: new ListView.DataSource({
getRowData: getRowData,
rowHasChanged: (r1, r2) => r1 !== r2,
}),
};

this.renderRow = this.renderRow.bind(this)

}


renderRow(rowData, rowID, highlightRow) {
return (
<View />
)
}

我们要做的界面是这个样子

从上图可以看出来新闻分为 3 种样式,轮播图、有一张图片的和二、三张图片的。

接下来开始解析数据,解析完 json 数据发现只有一个数组,轮播图是取了前四个,剩下的根据 ImagesList 里图片的个数来判断,

.then((json) => { 加入

1
2
3
4
5
6
7
8
9
10
11
12
13
14
15
16
let list = json.NewsList

let swipers = []
let news = []

for (let index in list) {
let dic = list[index]
index < 4 ? swipers.push(dic) : news.push(dic)
}

news.splice(0, 0, swipers)


this.setState({
dataSource: this.state.dataSource.cloneWithRows(news)
})

现在 news 的数据结构为:

1
2
3
4
5
6
7
8
9
10
[
[
{},
{}
],

{},
{}
}

然后去 renderRow 处理数据

如果是数组,那么返回轮播图:

1
2
3
4
5
6
7
8
9
10
11
12
if (Object.prototype.toString.call(rowData) === '[object Array]') {
return (
<CarousePicture
index={2}
ref="ScrollView"
rowData={rowData}
style={{width, height: 200}}
touchIn={this.props.touchIn}
>
</CarousePicture>
)
}

这里的轮播图本来用的 Swiper,但是在 Android 上有很多 BUG,我只好自己写了一个,但是在 Android 上的体验差强人意,源码在这里,把文件导入项目即可。

具体的可以看这里

touchIn 是由于在 Andoird 上两个 ScrollView 重叠时,处于顶部的 ScrollView 滑动事件不会响应,因为底部的 ScrollView 进行了响应并拦截了事件,我们需要在手指接触到轮播图的时候禁用底部 ScrollView 的滑动属性,再手指离开的时候再进行恢复,所以还需要去 Home.js 加入:

1
2
3
4
5
6
7
8
9
10
11
12
13
14
15
16
17
18
19
20
 _getNewsLists() {
let lists = []
if (this.state.list) {
for (let index in this.state.list) {
let dic = this.state.list[index]
lists.push(
<NewsList
key={index}
style={{backgroundColor:'white', width: width, height: height - 64 - 49 - 30}}
dic={dic}
isRequest={index == 0}
touchIn={(scrollEnabled) => {
this.refs.ScrollView.setNativeProps({scrollEnabled: !scrollEnabled})
}}
/>
)
}
}
return lists
}

然后根据 ImagesList 的个数来区分:

1
2
3
4
5
6
7
8
9
10
11
12
13
14
15
16
17
18
19
20
21
22
23
24
25
26
27
28
29
30
31
32
33
34
35
36
37
38
39
40
41
42
43
44
45
46
47
48
49
50
51
52
53
54
55
56
57
58
let imagesList = rowData.ImagesList

if (imagesList && imagesList.length == 1) {
return (
<TouchableOpacity style={{width, backgroundColor:'white'}}>
<View
style={{width, backgroundColor:'white', flexDirection:'row', justifyContent:'space-between', flex:1}}>
<Image
resizeMode="cover"
style={{marginTop: 10, marginBottom:10, marginLeft: 10, width: 80, height: 80, backgroundColor:'#EEEEEE'}}
source={{uri:imagesList[0].ImgPath}}
/>

<View
style={{ marginRight: 10,backgroundColor:'white', marginTop: 10, height: 80, width: width - 110}}
>
<Text>{rowData.Title}</Text>
<View style={{flex:1, flexDirection: 'row', justifyContent: 'space-between'}}>
<Text style={{marginTop:10, fontSize: 13, color: '#999999'}}>{rowData.Source}</Text>
<Text style={{marginRight:0,marginTop:10,fontSize: 13, color: '#999999'}}>{rowData.PublishTime}</Text>
</View>
</View>
</View>
<View style={{width, height:1, backgroundColor: '#EEEEEE'}}></View>
</TouchableOpacity>
)
}

let images = []

for (let index in imagesList) {
let dic = imagesList[index]
images.push(
<Image
resizeMode="cover"
key={index}
style={{marginRight: 10, marginLeft: index == 0 ? 10 : 0, marginTop:10, marginBottom: 10,flex:1, height: 90}}
source={{uri:dic.ImgPath}}
/>
)
}

return (
<TouchableOpacity style={{width, backgroundColor:'white'}}>

<View style={{width,backgroundColor:'white'}}>
<Text style={{marginLeft: 10, marginTop: 10}}>{rowData.Title}</Text>
</View>
<View style={{flexDirection:'row'}}>
{images}
</View>
<View style={{flex:1, flexDirection: 'row', justifyContent: 'space-between'}}>
<Text style={{marginLeft: 10, marginBottom: 10,fontSize: 13, color: '#999999'}}>{rowData.Source}</Text>
<Text style={{marginRight:10,fontSize: 13, marginBottom: 10,color: '#999999'}}>{rowData.PublishTime}</Text>
</View>
<View style={{width, height:1, backgroundColor: '#EEEEEE'}}></View>
</TouchableOpacity>
)

我这里的 style 没有进行整理,所以看着比较乱,正式开发中应该整理到 styles 里,看起来就简洁多了。

现在运行就可以显示第一页的数据了。

下篇文章处理上下拉刷新加载。

React Native (一):基础

React Native (二):StatusBar 、 NavigationBar 与 TabBar

React Native (三):自定义视图

React Native (四):加载新闻列表

React Native (五):上下拉刷新加载

React Native (六):加载所有分类与详情页

这次我们要做的仿 新闻头条 的首页的顶部标签列表,不要在意新闻内容。

1.请求数据

首先做顶部的目录视图,首先我们先获取数据:

Home.js 中加入方法:

1
2
3
4
5
6
7
8
9
10
11
12
13
14
15
16
17
18
19
20
21
22
23
24
componentDidMount() {
let url = 'http://api.iapple123.com/newscategory/list/index.html?clientid=1114283782&v=1.1'
fetch(url, {
method: 'GET',
headers: {
'Accept': 'application/json',
'Content-Type': 'application/json',
},
})
.then((res) => {
res.json()
.then((json) =>{
LOG('GET SUCCESS =>',url, json)

})
.catch((e) => {
LOG('GET ERROR then =>',url,e)

})
})
.catch((error) => {
LOG('GET ERROR=>',url, '==>',error)
})
}

componentDidMount()是在此页面加载完成后由系统调用。

用到的 LOG 需要在 setup.js 添加全局方法 :

1
2
3
4
5
6
7
8
9
10
11
12
13
14
global.LOG = (...args) => {

if(__DEV__){
// debug模式
console.log('/------------------------------\\');
console.log(...args);
console.log('\\------------------------------/');
return args[args.length - 1];
}else{
// release模式
}

};

完整的生命周期可以看这个 文档

我们使用 fetch 进行请求数据,你也可以用 这里 的方法进行请求数据。

注意在 iOS 中需要去 Xcode 打开 ATS

2.自定义视图

Home 文件夹内创建 SegmentedView.js

先定义一个基础的 View

1
2
3
4
5
6
7
8
9
10
11
12
13
14
15
16
17
18
19
20
21
22
23
24
25
26
27
28
import React from 'react'

import {
View,
StyleSheet,
Dimensions
} from 'react-native'
const {width, height} = Dimensions.get('window')

export default class SegmentedView extends React.Component {
render() {
const { style } = this.props
return (
<View style={[styles.view, style]}>

</View>
)
}
}


const styles = StyleSheet.create({
view: {
height: 50,
width: width,
backgroundColor: 'white',
}
})

这里的 const {width, height} = Dimensions.get('window') 是获取到的屏幕的宽和高。

然后在 Home.js 加入 SegmentedView:

1
2
3
4
5
6
7
8
9
10
11
12
13
14
15
16
17
18
19
import SegmentedView from './SegmentedView'

render() {
return (
<View style={styles.view}>
<NavigationBar
title="首页"
unLeftImage={true}
/>

<SegmentedView
style={{height: 30}}
/>


</View>
)
}

SegmentedViewconst { style } = this.props 获取到的就是这里设置的 style={height: 30}

<View style={[styles.view, style]}> 这样设置样式,数组中的每一个样式都会覆盖它前面的样式,不过只会覆盖有的 key-value,比如这里 style={height: 30} ,它只会覆盖掉前面的 height ,最终的样式为 :

1
2
3
4
5
6
{
height: 30,
width: width,
backgroundColor: 'white',
}

3.传数据

请求到的数据需要传给 SegmentedView 来创建视图,我们在 Home.js 加入构造,现在的 Home.js 是这样的:

1
2
3
4
5
6
7
8
9
10
11
12
13
14
15
16
17
18
19
20
21
22
23
24
25
26
27
28
29
30
31
32
33
34
35
36
37
38
39
40
41
42
43
44
45
46
47
48
49
50
51
52
53
54
55
56
57
58
59
60
61
62
63
64
65
66
67
68
69
70
import React from 'react'

import {
View,
StyleSheet
} from 'react-native'

import NavigationBar from '../Custom/NavBarCommon'
import SegmentedView from './SegmentedView'

export default class Home extends React.Component {

// 构造
constructor(props) {
super(props);
// 初始状态
this.state = {
list: null
};
}

componentDidMount() {
let url = 'http://api.iapple123.com/newscategory/list/index.html?clientid=1114283782&v=1.1'
fetch(url, {
method: 'GET',
headers: {
'Accept': 'application/json',
'Content-Type': 'application/json',
},
})
.then((res) => {
res.json()
.then((json) =>{
LOG('GET SUCCESS =>',url, json)

this.setState({
list: json.CategoryList
})
})
.catch((e) => {
LOG('GET ERROR then =>',url,e)
})
})
.catch((error) => {
LOG('GET ERROR=>',url, '==>',error)
})
}

render() {
return (
<View style={styles.view}>
<NavigationBar
title="首页"
unLeftImage={true}
/>
<SegmentedView
list={this.state.list}
style={{height: 30}}
/>
</View>
)
}
}

const styles = StyleSheet.create({
view: {
flex:1,
backgroundColor: 'white'
}
})

再数据请求完成后调用 setState() ,系统会收集需要更改的地方然后刷新页面,所以这个方法永远是异步的。

现在请求完数据后就会把数组传给 SegmentedView 了。

再看 SegmentedView ,我们需要用一个 ScrollView 来放置这些标签:

1
2
3
4
5
6
7
8
9
10
11
12
13
14
15
16
17
18
19
20
21
22
23
24
25
26
27
28
29
30
31
32
33
34
35
36
37
38
39
40
41
42
43
44
45
46
47
48
49
50
51
52
53
54
55
56
57
58
59
60
61
62
63
64
65
66
67
68
69
70
71
72
73
74
75
76
77
78
79
80
81
82
83
84
85
86
87
88
89
90
91
92
93
94
95
96
import React from 'react'

import {
View,
StyleSheet,
Text,
TouchableOpacity,
Dimensions,
ScrollView
} from 'react-native'

const {width, height} = Dimensions.get('window')


// 一 屏最大数量, 为了可以居中请设置为 奇数
const maxItem = 7

export default class SegmentedView extends React.Component {

// 构造
constructor(props) {
super(props);
// 初始状态
this.state = {
itemHeight: 50,
};

if (props.style && props.style.height > 0) {
this.state = {
...this.state,
itemHeight: props.style.height, //如果在使用的地方设置了高度,那么保存起来方便使用
};
}
this._getItems = this._getItems.bind(this)
}

_getItems() {
const { list } = this.props //获取到 传入的数组

if (!list || list.length == 0) return []

// 计算每个标签的宽度
let itemWidth = width / list.length

if (list.length > maxItem) {
itemWidth = width / maxItem
}

let items = []
for (let index in list) {
let dic = list[index]
items.push(
<View
key={index}
style={{height: this.state.itemHeight, width: itemWidth, alignItems: 'center', justifyContent:'center',backgroundColor:'#EEEEEE'}}
>
{/* justifyContent: 主轴居中, alignItems: 次轴居中 */}

<Text>{dic.NameCN}</Text>
</View>
)
}

return items
}

render() {
const { style } = this.props

return (
<View style={[styles.view, style]}>
<ScrollView
style={styles.scrollView}
horizontal={true} //横向显示
showsHorizontalScrollIndicator={false} //隐藏横向滑动条
>
{this._getItems()}
</ScrollView>
</View>
)
}
}


const styles = StyleSheet.create({
view: {
height: 50,
width: width,
backgroundColor: 'white',
},

scrollView: {
flex:1,
backgroundColor: '#EEEEEE',
}
})

4.使标签可选并改变偏移量

现在运行已经可以显示出标签列表了,我们还需要能点击,有选中和未选中状态,所以我们把数组中添加的视图封装一下:

1
2
3
4
5
6
7
8
9
10
11
12
13
14
15
16
17
18

class Item extends React.Component {
render() {

const {itemHeight, itemWidth, dic} = this.props

return (
<TouchableOpacity
style={{height: itemHeight, width: itemWidth, alignItems: 'center', justifyContent:'center',backgroundColor:'#EEEEEE'}}
>
{/* justifyContent: 主轴居中, alignItems: 次轴居中 */}

<Text>{dic.NameCN}</Text>
</TouchableOpacity>
)
}
}

我们需要可以点击,所以把 View 换成了 TouchableOpacity,记得在顶部导入。

然后修改数组的 push 方法

1
2
3
4
5
6
7
8
9
10

items.push(
<Item
key={index}
itemHeight={this.state.itemHeight}
itemWidth={itemWidth}
dic={dic}
/>
)

现在运行已经可以点击了,接下来设置选中和未选中样式,在 Item 内加入:

1
2
3
4
5
6
7
8

constructor(props) {
super(props);
// 初始状态
this.state = {
isSelect: false
};
}

Text 加入样式:

1
<Text style={{color: this.state.isSelect ? 'red' : 'black'}}>{dic.NameCN}</Text>

TouchableOpacity 加入点击事件:

1
2
3
4
5
6
7
8
9
<TouchableOpacity
style={{height: itemHeight, width: itemWidth, alignItems: 'center', justifyContent:'center',backgroundColor:'#EEEEEE'}}
onPress={() => {
this.setState({
isSelect: true
})
}}
>

现在标签已经可以进行点击,点击后变红,我们需要处理点击后让上一个选中的变为未选中,我们给 Item 加一个方法:

1
2
3
4
5
_unSelect() {
this.setState({
isSelect: false
})
}

我们还需要接收一个回调函数: onPress

1
2
3
4
5
6
7
8
9
10
11
const {itemHeight, itemWidth, dic, onPress} = this.props

<TouchableOpacity
style={{height: itemHeight, width: itemWidth, alignItems: 'center', justifyContent:'center',backgroundColor:'#EEEEEE'}}
onPress={() => {
onPress && onPress()
this.setState({
isSelect: true
})
}}
>

现在去 items.push 加入 onPress ,我们还需要一个状态 selectItem 来记录选中的标签:

1
2
3
4
5
6

// 初始状态
this.state = {
itemHeight: 50,
selectItem: null,
};
1
2
3
4
5
6
7
8
9
10
11
<Item
ref={index} //设置 ref 以供获取自己
key={index}
itemHeight={this.state.itemHeight}
itemWidth={itemWidth}
dic={dic}
onPress={() => {
this.state.selectItem && this.state.selectItem._unSelect() //让已经选中的标签变为未选中
this.state.selectItem = this.refs[index] //获取到点击的标签
}}
/>

现在运行,就可以选中的时候取消上一个标签的选中状态了,但是我们需要默认选中第一个标签。

我们给 Item 加一个属性 isSelect

1
2
3
4
5
6
7
8
9
10
11
12
<Item
ref={index} //设置 ref 以供获取自己
key={index}
isSelect={index == 0}
itemHeight={this.state.itemHeight}
itemWidth={itemWidth}
dic={dic}
onPress={() => {
this.state.selectItem && this.state.selectItem._unSelect() //让已经选中的标签变为未选中
this.state.selectItem = this.refs[index] //获取到点击的标签
}}
/>

修改 Item :

1
2
3
4
5
6
7
8
constructor(props) {
super(props);
// 初始状态
this.state = {
isSelect: props.isSelect
};
}

现在运行发现第一项已经默认选中,但是点击别的标签,发现第一项并没有变成未选中,这是因为 this.state.selectItem 初始值为 null,那我们需要把第一项标签赋值给它。

由于只有在视图加载或更新完成才能通过 refs 获取到某个视图,所以我们需要一个定时器去触发选中方法。

Itemconstructor() 加入定时器:

1
2
3
4
5
6
7
8
9
10
11
12
13
14
15
constructor(props) {
super(props);
// 初始状态
this.state = {
isSelect: props.isSelect
};

this.timer = setTimeout(
() =>
props.isSelect && props.onPress && props.onPress() //100ms 后调用选中操作
,
100
);
}

搞定,最后我们还需要点击靠后的标签可以自动居中,我们需要操作 ScrollView 的偏移量,给 ScrollView 设置 ref='ScrollView'

1
2
3
4
5
6
7

<ScrollView
ref="ScrollView"
style={styles.scrollView}
horizontal={true}
showsHorizontalScrollIndicator={false}
>

然后去 items.push 加入偏移量的设置:

1
2
3
4
5
6
7
8
9
10
11
12
13
14
15
16
17
<Item
ref={index}
key={index}
isSelect={index == 0}
itemHeight={this.state.itemHeight}
itemWidth={itemWidth}
dic={dic}
onPress={() => {
this.state.selectItem && this.state.selectItem._unSelect()
this.state.selectItem = this.refs[index]

if (list.length > maxItem) {
let meiosis = parseInt(maxItem / 2)
this.refs.ScrollView.scrollTo({x: (index - meiosis < 0 ? 0 : index - meiosis > list.length - maxItem ? list.length - maxItem : index - meiosis ) * itemWidth, y: 0, animated: true})
}
}}
/>

现在的效果:

effect

项目地址